Cleaning Dogs Ears: Essential Steps and Common Mistakes
Overview
This article serves as a compassionate guide for dog owners, outlining essential steps and common mistakes in cleaning their furry family members’ ears to ensure both health and comfort. It highlights the importance of using veterinarian-approved cleaning solutions and proper techniques while recognizing signs of infection. By addressing these concerns, we provide a nurturing approach to maintaining your pet’s ear hygiene safely, fostering a sense of confidence and care in every dog owner.
Introduction
Cleaning your dog’s ears is a vital yet often overlooked part of pet care that can greatly influence their overall health. As a loving pet owner, it’s essential to understand the key steps and common pitfalls associated with this task, ensuring your furry family members remain comfortable and free from potential infections.
But what happens when the cleaning process inadvertently causes more harm than good? In this article, we will explore the best practices for ear cleaning, outline the necessary supplies, and address frequent mistakes that could jeopardize your dog’s ear health.
Together, we will guide you toward a safer and more effective approach to caring for your beloved pet.
Gather Necessary Supplies for Ear Cleaning
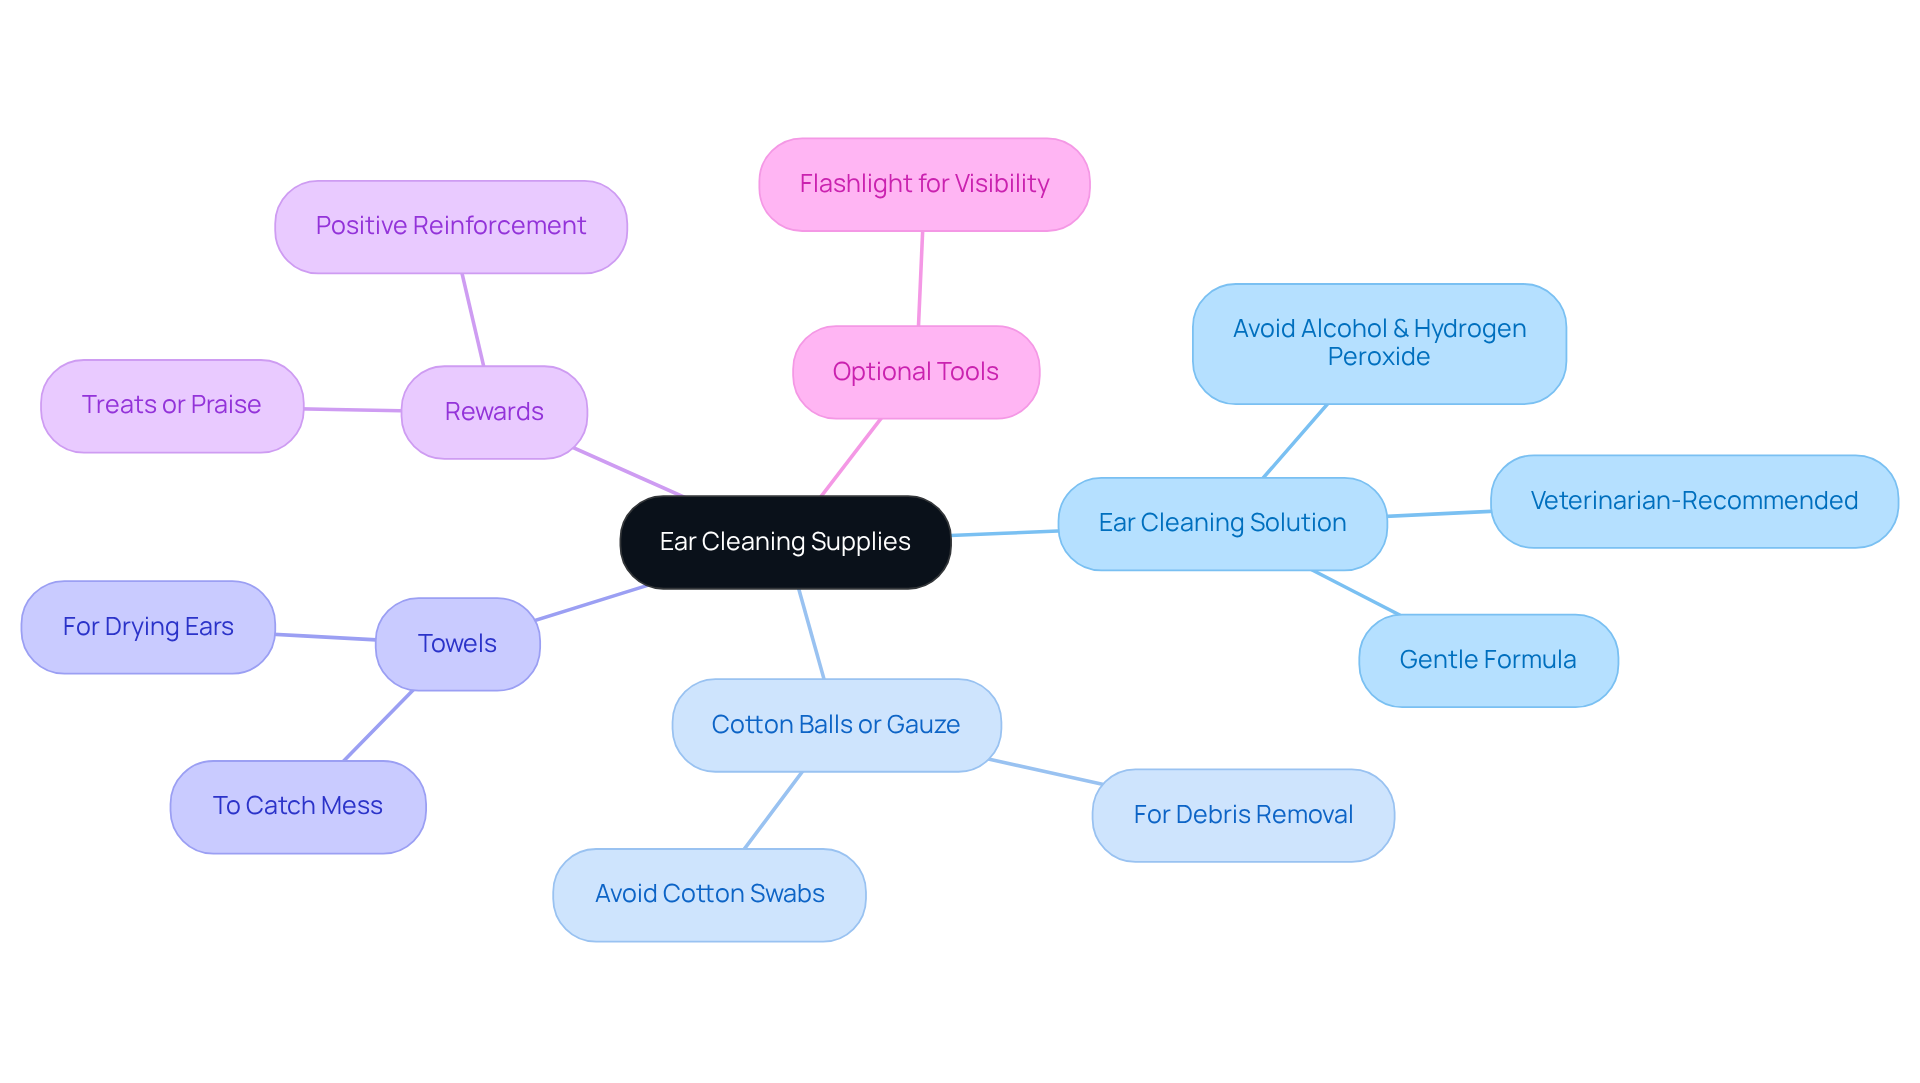
To effectively clean your dog’s ears, it’s important to gather some essential supplies that will help ensure a safe and positive experience for your furry family member:
-
Dog Ear-Cleaning Solution: Choose a veterinarian-recommended ear cleaner that’s specifically formulated for dogs. It’s crucial to steer clear of products containing alcohol or hydrogen peroxide, as these can irritate the sensitive ear canal. Remember, gentle, veterinarian-approved ear cleaners are vital for maintaining ear health.
-
Cotton Balls or Gauze: These are essential for removing debris and sanitizing the ear. Avoid cotton swabs, as they can push debris deeper into the ear canal, potentially causing harm. As one veterinarian wisely cautioned, “Never use a cotton swab or go deep into the ear as it can cause damage.”
-
Towels: Keep a tidy, dry towel on hand to catch any mess and assist in drying your dog’s ears after washing.
-
Rewards: Use treats or praise to acknowledge your dog’s cooperation during this process, helping to create a positive experience that they will associate with ear cleaning.
-
Optional: A flashlight can be quite helpful for improved visibility within your dog’s auditory canals, especially if there’s considerable wax or debris accumulation.
Routine ear care, especially cleaning dogs ears, is crucial for preserving your dog’s ear wellness, particularly for breeds that are more susceptible to ailments. While most dogs do not require their ears to be maintained monthly, signs such as a slight smell or increased head shaking might indicate a need for maintenance. Veterinarians emphasize the importance of utilizing these materials to ensure a safe and effective process for cleaning dogs ears, highlighting the significance of regular ear maintenance to prevent health issues. By taking these steps, you’re nurturing your dog’s well-being and ensuring their comfort.
Follow a Step-by-Step Process to Clean Your Dog’s Ears
To effectively clean your furry family member’s ears, follow these essential steps:
- Prepare Your Dog: Choose a quiet, comfortable area where your dog feels secure. If your pet is anxious, having someone assist in holding them can be beneficial.
- Examine the Ears: Before cleaning, inspect for signs of illness such as redness, swelling, or foul odors. If any symptoms are present, consult your veterinarian before proceeding. Remember, ear infections, or ‘otitis,’ are one of the top three reasons canines visit a veterinarian.
- Apply the Ear Cleaner: Gently lift your dog’s ear flap and squeeze the ear-cleaning solution into the ear canal, ensuring it reaches the inner parts. It’s important to choose an appropriate ear cleaner that is ceruminolytic and safe for dogs.
- Massage the Base of the Ear: Lightly massage the base of the ear for 20-30 seconds to help the solution break down wax and debris.
- Let Your Dog Shake: Allow your dog to shake their head, which helps dislodge debris and excess solution.
- Wipe Away Debris: Use a cotton ball or gauze to clean the inside of the ear flap and outer ear canal, stopping at the first knuckle to avoid injury.
- Repeat if Necessary: If the ear still appears dirty, repeat the process with fresh cotton balls or gauze. It is advised to engage in cleaning dogs ears once or twice a week to prevent ear issues.
- Reward Your Dog: After tidying up, offer a treat and praise to reinforce positive behavior.
By adhering to these steps, you can preserve your dog’s ear health and avert possible ailments, ensuring a happier and healthier pet. Remember, if you observe any indications of infection, consult your veterinarian before proceeding with the sanitation.

Identify Common Mistakes and Troubleshoot Cleaning Issues
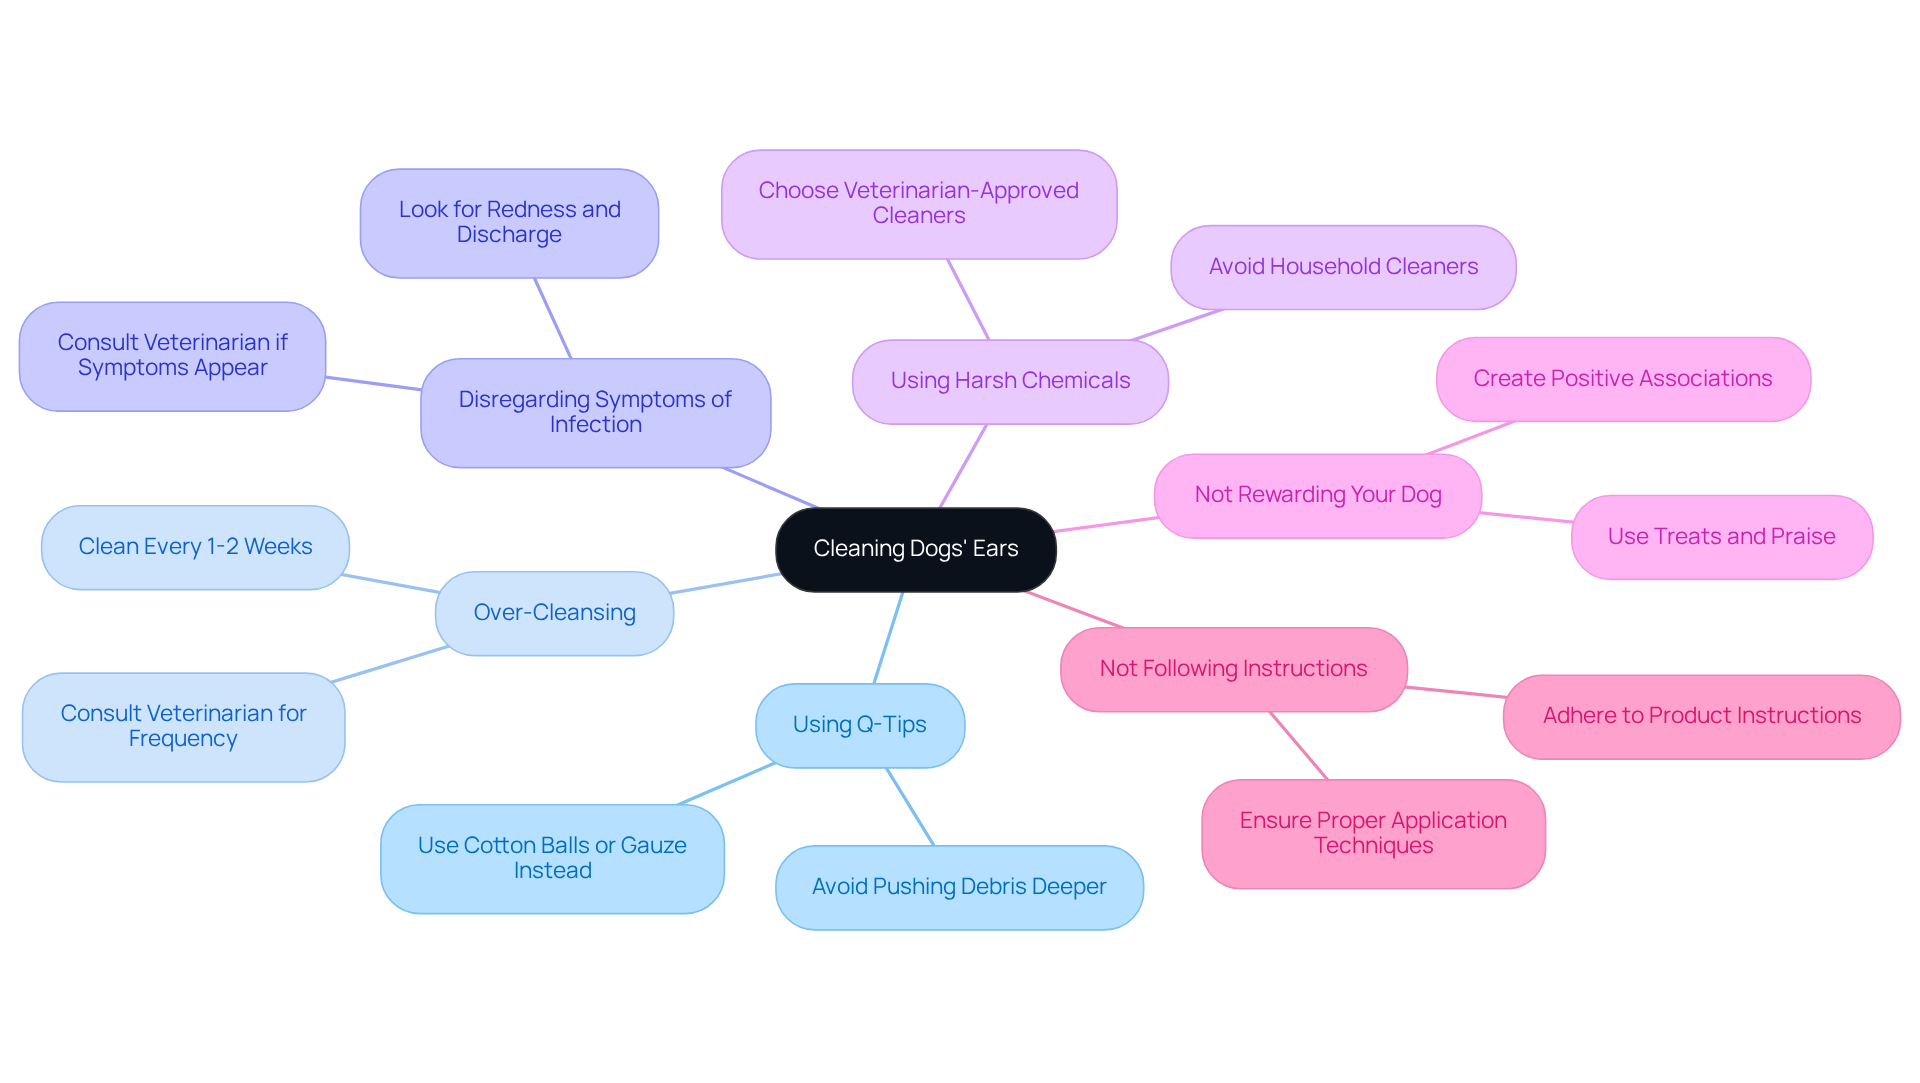
When it comes to cleaning dogs’ ears, it’s essential to avoid common mistakes that could lead to discomfort or health issues. Let’s explore some pitfalls to be mindful of, along with helpful troubleshooting tips:
- Using Q-Tips: While it may be tempting, cotton swabs can inadvertently push debris deeper into the ear canal, risking damage to the eardrum. Instead, opt for cotton balls or gauze to ensure safe sanitation.
- Over-Cleansing: It’s easy to overdo it, but excessive cleaning can irritate the ear canal and increase the risk of ailments. Generally, it’s recommended that cleaning dogs’ ears be done every 1-2 weeks or as directed by your veterinarian, especially for breeds prone to ear issues. Some dogs may require more frequent grooming, particularly those susceptible to ear problems.
- Disregarding Symptoms of Infection: If your dog exhibits signs of discomfort, such as frequent head shaking or scratching at their ears, it’s crucial to pause the grooming and consult your veterinarian. Look out for redness, discharge, or an unpleasant smell, as these may indicate a health issue. As Dr. Malcolm Weir emphasizes, proper sanitation methods are vital, and any signs of infection should prompt a veterinary visit.
- Using Harsh Chemicals: Household cleaners or alcohol-based products can irritate your dog’s delicate ears. Always choose veterinarian-approved ear cleaners that are specifically formulated for pets, ensuring their safety and comfort.
- Not Rewarding Your Dog: Remember, failing to reward your dog during ear care can create anxiety around the process. Use treats and praise to foster a positive association with ear care, making future maintenance a breeze.
- Not Following Instructions: Always adhere to the instructions provided with your ear-cleaning solution. Some products may have specific application techniques or required contact times to ensure effectiveness.
Additionally, a study found that approximately 5% of home-use ear cleaner applicator tips showed bacterial contamination, highlighting the importance of maintaining hygiene during ear cleaning. By being aware of these common mistakes and following these troubleshooting tips for cleaning dogs’ ears, you can help keep your dog’s ears healthy and prevent potential infections. Remember, your commitment to their care creates a nurturing environment where they can thrive.
Conclusion
Cleaning your dog’s ears is not just a task; it’s a vital aspect of pet care that ensures the overall health and comfort of your furry family members. By understanding the necessary supplies, following a step-by-step process, and being aware of common mistakes, you can effectively maintain your pet’s ear hygiene. This proactive approach not only prevents infections but also fosters a positive experience for both you and your beloved companion.
Essential tools, such as veterinarian-recommended ear cleaners and cotton balls, play a crucial role in this process. Remember to reward your dog during the cleaning, as this can make the experience more enjoyable for both of you. It’s also important to observe any symptoms that may indicate health issues and to avoid harmful practices like using cotton swabs or harsh chemicals. By adhering to these guidelines, you can ensure a safe and effective ear cleaning routine that contributes to your pet’s well-being.
Ultimately, your commitment to proper ear care reflects responsible pet ownership. By taking the time to learn and implement these techniques, you create a nurturing environment that promotes health and happiness. Regular ear cleaning not only prevents potential health problems but also strengthens the bond between you and your pet, making it an essential part of any dog care regimen. So, let’s take that step together towards a healthier and happier life for your furry friend!
Frequently Asked Questions
What supplies do I need to clean my dog’s ears effectively?
You will need a veterinarian-recommended dog ear-cleaning solution, cotton balls or gauze, towels, and treats or praise for rewards. An optional flashlight can also be helpful for visibility.
What type of ear-cleaning solution should I use for my dog?
Choose a veterinarian-recommended ear cleaner specifically formulated for dogs, avoiding products that contain alcohol or hydrogen peroxide, as they can irritate the ear canal.
Why should I avoid using cotton swabs for ear cleaning?
Cotton swabs can push debris deeper into the ear canal, potentially causing harm. It is advised to use cotton balls or gauze instead.
How can I make the ear cleaning process positive for my dog?
Use treats or praise to reward your dog for their cooperation during the cleaning process, helping them associate ear cleaning with a positive experience.
How often should I clean my dog’s ears?
Most dogs do not require monthly ear cleaning, but signs such as a slight smell or increased head shaking may indicate a need for maintenance.
Why is routine ear care important for my dog?
Routine ear care is crucial for preserving your dog’s ear health, especially for breeds more susceptible to ear ailments. Regular maintenance helps prevent health issues.


